Ultimate Work Bench        

Design by Gerry Dale / RCM

Notes by Marty Moleski, SJ

The design for this bench is by Gerry Dale. It was published in RCM in April, 2001 (pp. 154-155). Subscribers to RCM can access the article online here. He used 2x6" material for the top frame. I wanted to keep my bench at desk height with room to sit comfortably at it correcting exams and papers, so I used 2x4" for the frame instead.

I had a very hard time understanding the article, so I made up my own terminology. What he calls the "working surface" I think of as the "floating top." What he calls the "base top" I call the "fixed top."

Materials:

Quantity
Item
Cost
1 4x8' x 3/4" birch plywood (floating top/working surface) $70
2 4x8' x 3/4" fir plywood (fixed top/base top, braces for floating top/working surface) $70
8 2x4" hem fir studs  $24
2 1x2" x 8' poplar (edging for sides of top; he used oak) $10
2 1x2" x 5' poplar or oak (edging for ends of top) $6
25 2" x 5/16" hex-head bolts $13
25 nuts
25 T-nuts (blind nuts)
75 washers
1 box 3" deck screws $4
1 box 1 1/4" deck screws $4
1 bottle Carpenter's glue $4
$205

  My building sequence:  
  1. [Optional] Cut up old desk; rebuild drawer assemblies to slide under finished work bench.
  2. Rip one sheet of fir plywood into strips to make braces for the underside of the floating top. See article and next step for details on widths.
  3. Attach five braces to underside of birch ply top (floating top). The braces at either end are 6"; the three internal braces are 3" each. I placed the internal braces at 24", 48", and 72" from the end. Hmm, looking at the article again, it seems that he may have had 2" braces running the length of the top as well as the 5 cross-braces; I didn't use anything there. Oh, well. I used six short deck screws and some glue to attach the braces. I also used deck screws to hold the T-nuts (blind nuts) in place, so those also help to secure the braces to the floating top.
  4. Place the fir plywood piece for the fixed top over the braces and the floating top. Align carefully.
  5. Drill 25 5/16" holes through fixed top and the braces, and into the floating top. Limit the depth of these holes--DO NOT PIERCE THE TOP SURFACE. Remember that the whole point of the design is to be able to adjust the 25 bolts as needed, so be sure to place them a comfortable distance away from the 2x4s under the fixed top. Dale used a different technique: "In order to ensure exact alignment of the bolts, I chose to lay out and drill the holes for them in the base-top [fixed top] and then transfer these holes to the bottom of the working surface [floating top] sub-frame after the working surface was assembled." I thought it was a lot safer and easier to drill the holes all at once. It seems to have worked out OK.
  6. Set fixed top aside. Insert T-nuts into the holes into the holes in the braces under the floating top. Hold in place with two short deck screws for each T-nut. I widened the holes with a 3/8" bit in order to make insertion of the T-nuts easier.
  7. Build the frame and legs. I used eight 29" legs; the finished bench is about 32" high. I put four internal 2x4" braces at 12", 36", 60", and 84". I cut triangle stock and braced all of the legs inside the frame instead of using cross-bracing on the table legs as shown in the RCM article. I chose to orient my 2x4s differently from the way Dale did. If the bench turns out to be too wiggly, I figure I can add cross-braces where I need them.
  8. Install 25 sets of bolts, washers, and nuts in fixed top. Use CA to glue nut to bolt. The bolt should turn freely in the fixed top.
  9. Set the table frame upright. Attach the fixed top to the frame. I used short deck screws and no glue so that the table can be disassembled for ease in moving.
  10. Place the floating top over the fixed top. I used 1x2" scraps to help me keep the floating top off of the protruding bolts until the bolts and T-nuts were closely aligned.
  11. Lower floating top as much as seems appropriate for your circumstances. I set mine down about 1/4". If the bolts have 16 threads per inch, one turn of the bolt will move the top 1/16". I used a ratchet wrench with masking tape on the socket and a line drawn on the tape to help me count the turns. I don't know whether 5/16" bolts are available with a finer thread; the coarse thread was easy to obtain and should be accurate enough for my purposes.
  12. Attach trim to floating top.
  13. I am sealing my bench with polyurethane. I'm not confident that this is fuel-proof, so I've purchased 3 yards of clear vinyl ($10) to cover the top most of the time. I'll take the vinyl off when I want to build or align parts on the bench.

  14.  
It took me about a week to acquire the materials and assemble the bench. I bought the plywood at Thruway Plywood near Walden, the other wood at Frontier Lumber on Elmwood, and the bolts at North State Supply on Ontario Street and Military Road. I also purchased a 4' carpenter's level to help me keep the top flat and level ($30 at Home Depot). When I get serious about truing the top, I think I'll get a friend or two to help me. I'll turn the bolts from underneath and they can keep track of the effect from up above.

The hem fir studs are straight, but very dry and brittle. After I cracked a few pieces, I decided to drill pilot holes for the deck screws. I also cracked a couple of pieces of the poplar trim--I got too enthusiastic with some screws near the ends. Dale used carriage bolts to assemble parts of his frame. 


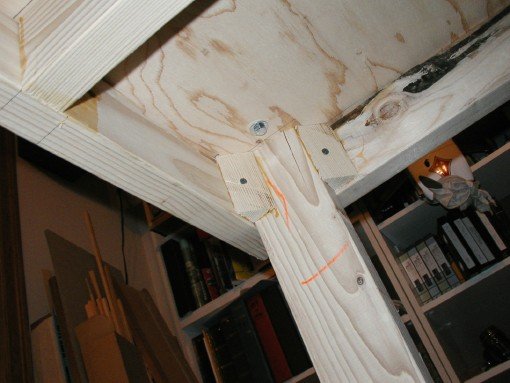
This photo shows the bolts from the top of the base (base top) to the underside of the floating top. Underneath the bench, you can see the desk drawers that I cut out of my old sway-backed desk.


View into my workshop from the hallway. That is an 80" UltraSport 1000 wing on the workbench . The two halves of the kit box are at the back of the bench.


My former workbench is up against the wall and is slowly being buried by tools and materials. It's a door laid over a pretty flat desk from school.


I have chosen not to use the diagonal braces recommended by Dale. I plan not to put a lot of stress on the table. I'll go down to the basement if I really need to whale away on something with a sledgehammer and a vise. In lieu of the side braces, I've used scrap 2x4" stock ripped into triangles at all the legs.


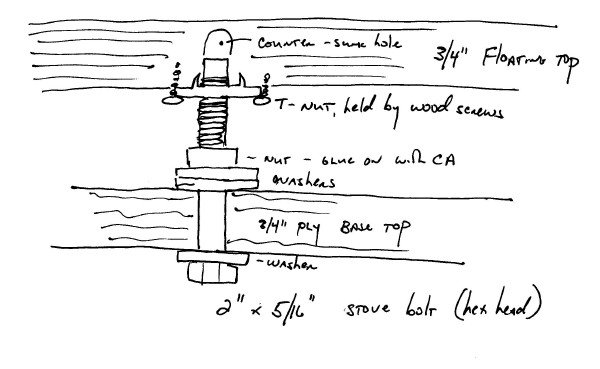
I had to draw a lot of pictures to prove to myself that 2" bolts would give me the height I wanted:


Questions and Answers

>...are those bolts only 2 inches long?

Yes.

> It would appear that 1 inch is taken up with the base top and washers

I'd guess more like 7/8"--5/64" per washer.

> and 1/2 inch for a nut ...

About a quarter inch.

> then it looks like there should be 1 inch remaining for the gap

The gap does not have to be high. I could draw my floating top down lower if I wanted to or needed to. But nothing happens in the gap. I actually use it for storage of a self-healing cutting pad and a scrap piece of Homasote.

> plus a reasonable amount within the blind nut.

I started with three or four turns, I think.

> I noticed that the RCM article did not mention the length.

Yes. I just made up my own mind, I guess.

> Thanks for your time......great web site!
> Bill Foster
> Bedford, Nova Scotia, Canada.

Thanks for the kind words. Thanks for the questions!


7 October 2017: Bye, Bench!

I signed the underside of the frame on 7 August 2001. Today, I finished hauling it out of my room and downstairs, where it will be someone else's problem. He plans to use it--or part of it--for a railroad layout.

I thoroughly enjoyed the bench, but I haven't been active in building and flying RC planes for nine years now (!). I know it is unkind to my brother Jesuits to leave a room in this condition when I'm dead, dying, or otherwise disabled. I've given away all of my airplanes and helicopters except for one built by another man. I hope to make a funeral pyre for that plane.

As you can see, the bench most collected things that collected dust. I began the transition to a new layout at 7:43 PM on 4 October, the feast of St. Francis of Asissi and the birthday of Uncel Dan, one of my good friends and major RC benefactors. I took him a van full of stuff earlier in the day after he mentioned that there was a local shortage of glo-fuel. I took over about a dozen very old gallons of fuel and about five gallons of methanol. I haven't heard how it is working for the guys yet.

8:46 PM. First layer of dust-catchers distributed elsewhere.

9:03 PM. Glass, vinyl, posters, mementoes gathered up. This is the first time the workbench has been uncovered since 2001.

There are 25 adjustment bolts that allow the floating top to be adjusted to be flat and level.

The bolts protrude through the fixed base. I decided to leave them there despite the danger that they presented to me and the bannisters on the way downstairs. The floating top is visible over on the right. As you can see, I woke up before dawn and got the floating top off before the sun came up.

Underside of the floating top.

Breathing a sigh of relief partway down the stairs.

Waiting to be hauled away.

Gives me shivers just looking at it. I've created a monster! You can see that the sun has come up. I think I stopped for some water and pizza and coffee before tackling the base.

Down one flight. Three chips from the railings, one ding on the wall. Live and learn!

Ahhhhhhhh. Micky Corcoran came to my rescue on the last flight of stairs to the outside door.

I feel GOOD!

<Back to Home Page>